
Rustic Charm: Farmhouse Mason Jar Pendant Light for Kitchen Island
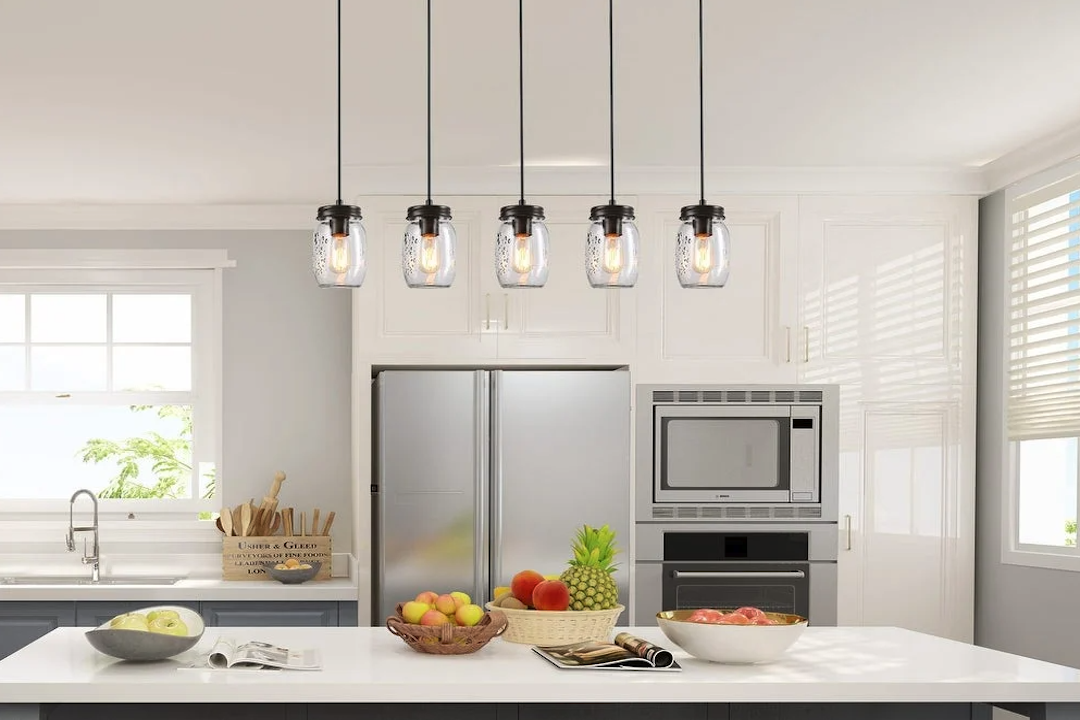
So, you’re looking at adding some farmhouse flair to your kitchen island, and you’ve stumbled upon the idea of using Mason jar pendant lights. Smart move! They’re definitely a popular choice, and for good reason. We’ll dive into what makes them work, how to pick the right ones, and some tips for getting them installed.
Beyond the “Prettiness”: Why Mason Jar Pendants Actually Work
Let’s cut to the chase. Why are these jars becoming such a kitchen island staple? It’s not just about looking cute, though they certainly do.
The Aesthetic Appeal
This is probably the most obvious reason. Mason jars just feel farmhouse. They harken back to a simpler time, a connection to the land, and a certain handcrafted charm. This aesthetic complements a lot of popular kitchen styles, from modern farmhouse to more traditional country looks.
Capturing the Farmhouse Vibe
Think worn wood, natural textures, and a sense of comfortable informality. Mason jar lights Muzzhome fit right into that picture. They’re not trying too hard to be fancy; they’re just… right.
Versatility in Styles
While the classic clear jar is common, you’ll find them in various colors like blue, green, and amber. You can also find jars with different lids, textures, or even distressed finishes. This means you can tailor them to your specific kitchen’s color palette and overall design mood.
The Practical Side of Things
Beyond the look, there are some practical advantages to using Mason jar pendant lights that make them a solid choice for kitchen islands.
Durability and Simplicity
These are, at their core, sturdy glass jars. They’re built to last. The electrical components are generally straightforward, and the design itself is simple. This often translates to easier maintenance and less chance of complex issues down the line.
Ease of Cleaning
Let’s be honest, kitchen islands can get a little… lived-in. Grease splatters, cooking steam – it all happens. The smooth glass of a Mason jar is usually a breeze to wipe down. No intricate nooks and crannies to trap dust and grime.
Cost-Effectiveness
Compared to many designer pendant lights, DIY or even pre-made Mason jar pendants can be quite budget-friendly. This allows you to achieve a high-impact look without breaking the bank, which is always a win in our book.
The Lighting Experience They Offer
The way these lights illuminate your space is another key factor. It’s not just about brightness; it’s about the quality and mood of the light.
Warm and Inviting Ambiance
The shape and material of a Mason jar tend to diffuse light in a soft, warm way. This creates a more intimate and welcoming atmosphere, perfect for a kitchen where people gather. It discourages harsh, direct lighting that can feel sterile.
Focused Task Lighting (When Needed)
While they offer a pleasant general glow, you can also strategically choose bulbs and jar types to create more focused task lighting over your island. This means you can still see what you’re doing when chopping veggies or preparing a meal.
Choosing Your Perfect Pair ( or Trio!): What to Look For
With so many options out there, how do you land on the right Mason jar pendant lights for your kitchen island? It boils down to a few key considerations.
The Jar Itself: Size, Shape, and Finish
The jar is the star, so it’s important to get it right.
Size Matters
Think about the scale of your kitchen island and the overall room. Too small, and they’ll get lost. Too large, and they can feel overwhelming. Standard Mason jar sizes (quart or pint) are usually a good starting point. Measure your island’s length and width to get a sense of proportion.
Shape and Style Variations
Beyond the classic ball-jar shape, you’ll find others like the hexagonal or even those with interesting embossed patterns. Consider how these shapes and textures will complement your existing kitchen cabinetry and decor.
Clear vs. Colored or Frosted
Clear jars offer the most straightforward light, letting the bulb shine through. Colored jars (blue, green, amber) can add a pop of color and a unique hue to your light. Frosted or etched jars diffuse light even more, creating a softer, more diffused glow that can be great for reducing glare.
The Hardware: More Important Than You Think
The “hardware” refers to the socket, cord, and canopy that hold the jar and connect it to the ceiling. This is where a lot of the style is really cemented.
Material and Finish of the Fixture
Brushed nickel, oil-rubbed bronze, matte black, antique brass – the metal finish of the hardware can drastically change the overall look. Matte black is a popular choice for a modern farmhouse feel, while oil-rubbed bronze leans into a more vintage aesthetic.
Cord Type and Length
You’ll typically find fabric-covered cords, which add a nice textural element. The length is crucial for proper hanging height. Make sure the cords are adjustable so you can get them at the perfect level above your island.
Canopy Style
The canopy is the piece that attaches to the ceiling. Some are simple and round, while others might be more decorative. Ensure it matches the overall style you’re going for.
Bulb Choice: The Unsung Hero
The bulb isn’t just for light; it’s an aesthetic component in itself when using transparent jars.
Exposed vs. Enclosed Bulbs
Will the bulb be fully visible? If so, consider decorative bulbs like Edison-style filaments. These add another layer of vintage charm. If you’re going for a cleaner look, a simpler LED bulb might be best.
Kelvin Temperature (The Warmth of the Light)
This is crucial for ambiance. For a cozy kitchen, aim for bulbs in the 2700K to 3000K range. This is considered “warm white” and will create that inviting glow we talked about. Avoid cooler blue tones unless you have a very specific modern design in mind.
Dimmability
For maximum flexibility, consider dimmable bulbs. This allows you to adjust the light level for different situations – bright for cooking, dim for relaxing.
Installation Options: DIY vs. Professional
Putting these lights up is a key step, and you have a couple of paths you can take.
The DIY Route: For the Handy Homeowner
If you’re comfortable with basic electrical work and have some tools, the DIY route can be very rewarding and cost-effective.
Kits and Components
You can often buy Mason jar pendant light kits that include all the necessary hardware. These usually involve attaching a pre-wired socket and cord assembly to the jar. You’ll need to ensure you have a sturdy overhead electrical box to attach the canopy to.
Tools You’ll Likely Need
Screwdriver, wire strippers, wire connectors, ladder, voltage tester, and possibly a drill. Always prioritize safety and turn off the power at the breaker box before you start any electrical work.
Important Safety Considerations
This is paramount. If you’re not 100% confident, it’s always better to err on the side of caution and call a professional. Improper electrical work can be dangerous.
Professional Installation: When to Call in the Experts
There are times when calling an electrician is the sensible and safest choice.
When You’re Not Comfortable with Electrical Work
Plain and simple, if you’ve never done this before, or if the idea makes you nervous, hire someone. It’s worth the peace of mind.
Complex Wiring or Ceiling Structures
If your ceiling has unusual wiring, recessed lighting that needs altering, or a difficult junction box situation, an electrician has the experience to navigate it.
Ensuring Compliance and Safety Codes
Professionals know the local building codes and safety standards. They’ll ensure the installation is done correctly and safely, which is crucial for your home and insurance.
Styling Your Mason Jar Pendants: Beyond the Basics
Once they’re up, how can you make them truly sing with your kitchen island? It’s all in the details.
Mixing and Matching Jars
Don’t feel like you have to use identical jars. A slight variation in color or even size can add visual interest. Perhaps one slightly larger jar in the center, flanked by two smaller ones, or a mix of clear and subtly tinted jars.
Creating a Grouping with Different Heights
Hanging the pendants at slightly different heights can add a dynamic, layered look. This works particularly well if you have a longer island. The variation breaks up the straight line and adds a bit more visual texture.
Incorporating Other Farmhouse Elements
Consider how the lights interact with your existing decor. Are your cabinets a painted soft gray? Does your backsplash have some texture? The Mason jars should feel like a natural extension of that.
The Role of the Bulb
As mentioned before, the bulb is a style element itself.
Edison Bulbs for Vintage Flair
These are almost a cliché for a reason. The warm, visible filaments add a charming antique touch that complements the Mason jar perfectly. They cast a lovely, romantic glow.
LED “Smart” Bulbs for Modern Convenience
If you want the look but also the functionality, consider LED bulbs that offer smart features like adjustable color temperature or even app control. You can achieve the warm glow and then brighten them up for tasks, all with your phone.
Lighting Layers: Adding More Ambiance
Pendant lights are great, but they’re usually not the only light source in a kitchen.
Accent Lighting Around the Island
Consider adding under-cabinet lighting or small accent lights to highlight countertops or decorative items on the island itself. This creates depth and visual interest.
General Room Illumination
Make sure your overhead room lighting is adequate, but designed to complement, not compete with, your island pendants. You want the pendants to be the star of the show for the island area.
Common Pitfalls and How to Avoid Them
Even with something as seemingly simple as Mason jar lights, there are a few common mistakes people make. Being aware of them can save you time and frustration.
Skipping the Measurement Step
It’s easy to get excited and just buy what looks good online. But without measuring your island and ceiling height, you risk getting pendants that are too big, too small, or hang at an awkward level.
Impact of Scale on the Overall Look
A tiny island with giant jars looks comical. A vast island with tiny little jars gets lost. Precision in planning prevents this.
Correct Hanging Height for Function and Aesthetics
Too high, and they don’t provide enough focused light. Too low, and they become a head-bumping hazard and can block sightlines across the island. Aim for about 30-36 inches above the countertop for most pendant lights.
“Too Much of a Good Thing” Syndrome
While a line of identical Mason jar pendants can look stunning, sometimes too many can feel overwhelming or monotonous.
Overcrowding the Island
Consider the number of pendants that will fit comfortably without making the island feel cluttered. Three is often a sweet spot for many standard-sized islands, but this can vary.
Lack of Visual Break or Interest
If every single element is a Mason jar, it can start to feel a bit repetitive. Think about how the jars relate to your other design choices.
Forgetting About Bulb Visibility and Heat
This is especially relevant if you’re using clear jars.
Choosing Bulbs that Clutter the View
A strange-shaped or very large bulb might detract from the clean lines of the jar itself.
Bulbs That Get Too Hot
Some older incandescent bulbs can generate a lot of heat, which isn’t ideal when they’re enclosed in glass relatively close to your workspace. LED bulbs are generally much cooler and more energy-efficient.
The Enduring Appeal of the Farmhouse Look
So, there you have it. Mason jar pendant lights for your kitchen island? It’s a practical, stylish, and often affordable way to inject that sought-after farmhouse charm into your home. They’re more than just a trend; they’re a testament to the beauty of simplicity and a connection to a more down-to-earth way of living. Whether you go the DIY route or opt for professionally installed fixtures, they’re a fantastic choice for bringing warmth and character to the heart of your home.
You May Also Like
IKEA Wall Lamp From The VARMBLIXT Collection
June 30, 2023
Premium Desk Lamp Accessories for Enhanced Lighting
October 28, 2024
Bedroom Dressers: A Stylish and Functional Addition to Your Space
December 14, 2022
Enhance Your Chandelier with High Quality Crystal Accessories
January 6, 2025
Kitchen and Dining Room Design Tips
March 23, 2023
Rustic Charm: Straw Roof Chandelier for Kids’ Room
December 6, 2024
Editors' Choice
How to Use a Floor Lamp Without Plug
June 16, 2023
Exquisite Chandelier Adds Luxury to Hotel Bar
September 2, 2025
+ There are no comments
Add yours